Emulate Mode Versus Live Mode

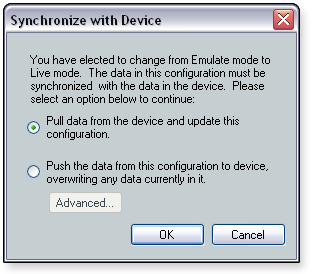
DSP Configurator has two operational modes: Emulate mode and Live mode. Emulate mode allows you to work offline from the device and save your work to disk. Connect to the device in Live mode to load your file onto the device or to make changes to your configuration in real time.

There are two methods of synchronizing the device with the DSP Configurator™ file when you enter Live mode: push data or pull data. Both are described in step 5 of the Emulate Mode to Live Mode subsection below. See the Operational Modes subsection of "DSP Configurator Workflow" for a description of the normal workflow.

When you perform a Pull Data synchronization method, preset data remains on the device, and only the list of preset names is pulled from the device. Presets in this state are marked with an asterisk (see the "Presets" section in the DMP 64 book, MPX Plus 866 A book, or MLS 608 D Series book depending on device), until the preset is recalled or a backup is performed (see the "Backup" section in the DMP 64 book,
MPX Plus 866 A book, or MLS 608 D Series book depending on device).
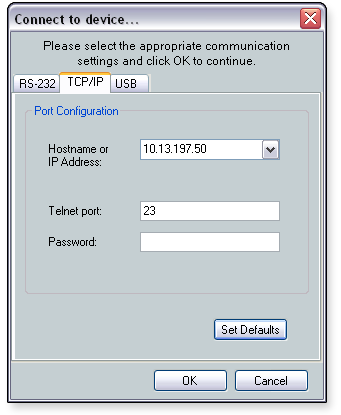
NOTE:  For the MPX Plus 866 A, if you intend to save presets to the device while in Live mode, see the DSP Usage section in the MPX Plus 866 A book for more information.

Emulate Mode to Live Mode

To go from Emulate mode to Live mode:

  1. When the application is in Emulate mode, click the Live button or press <F6> on your keyboard. A dialog box opens with a tab for each connection method. Connection options include RS-232, TCP/IP (for the MPX Plus 866 A and DMP 64 only), and USB (for the DMP 64 and MLS 608 D Series only).

  1. Select the tab (RS-232, TCP/IP, or USB) associated with the appropriate connection method. The following details are displayed on each tab.

  2. RS-232

    • COM Port - Select the COM port from the drop-down list.

    • Baud rate (must equal the rate that is set on the device) - Select the appropriate baud rate from the drop-down list.

    • Parity bit

    • Data bit

    • Stop bit

  3. TCP/IP (recommended for configuring DSP) (DMP 64 and MPX Plus 866 A only)

    • Host name or IP address - Select the host name or IP address from the drop-down list. Alternatively, you can enter the host name or IP address into the field.

    • Telnet port (defaults to 23) - Enter the Telnet port number

    • Password (responds to an administrator-level password only) - You only need to enter a password if a password exists on the device.

  4. USB - Front panel access for configuring DSP (DMP 64 and MLS 608 D Series only)

    • USB Devices - Select an Extron USB device from the drop-down list.

  1. Enter the necessary information for the desired connection.

  2. Click OK. The Synchronize with Device dialog box opens.

  1. Choose a method to synchronize the software with the device.

  2. Pull data from device and update this configuration (default) - This method downloads device settings from the device and synchronizes with DSP Configurator. Current DSP Configurator settings are overwritten.

  3. Push the data from this configuration to device, overwriting any data currently in it - This method uploads DSP Configurator settings to the device and overwrites the device settings. Selecting this option enables the Advanced button, which opens the Advanced Push Options dialog box with the following options.

    • Default (default) - This option pushes the entire configuration, including all processors, channel names, and presets, overwriting the configuration currently stored on the device.

    • Custom - The device disconnects after a custom push. Select one or both of the following check boxes:

    • Push Configuration (default) - Selecting this check box pushes only the configuration.

    • Push Presets - Selecting this check box pushes either all presets or only selected presets. When the Push Presets check box is selected, the follow radio buttons are available:

      • All (default) - Selecting this radio button pushes all presets.

      • Selected - Selecting this radio button pushes only selected presets. To choose which presets to push, select the desired presets from the list.

  1. If you are using the default push or pull method, skip this step. If you selected a custom push method from the Advanced dialog, click OK to return to the Synchronize with Device dialog.

  2. In the Synchronize with Device dialog, click OK. If a proper connection to the device is not established and the device cannot be found, an error message appears and indicates that the application cannot connect to the device.

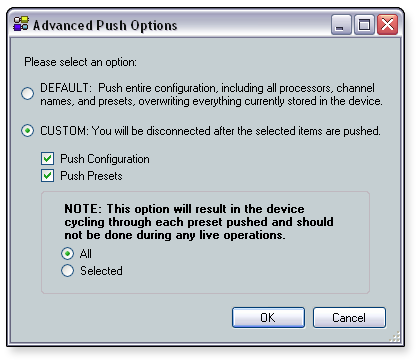
When a connection is established, the selected operation is performed. If you selected Custom > Push Presets > Selected, a dialog opens allowing you to select the presets to push to the device.

If you selected the pull data method and the file you are working from has unsaved information, a dialog box opens asking whether to save the settings before connecting to the device. Click Yes to save the file or click No to continue without saving. Clicking Yes opens the Save dialog.

Live Mode to Emulate Mode

To go from Live mode to Emulate mode:

  1. When the application is in Live mode, click the Emulate button or press <F6> on your keyboard. The Confirm dialog box opens, confirming the disconnection from the device.

  2. Click OK. DSP Configurator reverts to Emulate mode after the device is disconnected. The Current State name changes to Current Emulation.

While in Live mode, the Open function on the File menu is not available and a file may not be opened from disk. The New function on the File menu is not available, as well. Conversely, a file can be saved while the application is in Live mode. Only presets that are already part of the file or presets that are created while in Live mode will be saved with the file. Presets that exist only on the device will not be saved with the file.

In Live mode only, transmit and receive communication indicators are displayed in the lower right corner of the open workspace. These indicators light green to indicate that information is being transmitted to and received from the device.