Keyboard Navigation

SpeedNav™ keyboard navigation in DSP Configurator has been designed to allow navigation within the application and the execution of all configuration functions to be performed solely with the use of a keyboard. Some keyboard navigation behavior matches Microsoft® Windows® standards, while other behavior is specific to DSP Configurator.

When you first launch the program, the cursor focus is in the upper left corner, on the input 1 GAIN block. From there, use the keyboard arrow keys and <Tab> key to move within the program. <Shift + Tab> reverses the direction of the <Tab> key. Use the arrow keys to move to the channel name fields, then press <Tab> (input) or <Shift + Tab> (output) to move out of the name fields.

Function Keys

Keyboard function keys can be used to invoke the help file, navigate workspaces (see the DSP Configurator Workflow section), or toggle between Live and Emulate modes. Function key assignments are as follows:

  • <F1> - Invokes the DSP Configurator help file from anywhere within the application. When a dialog box is open, press <F1> to open context-specific help.

  • <F2> (MPX Plus 866 A and MLS 608 D Series only) - Opens the Audio & Video I/O workspace

  • <F3> - Opens the Audio I/O workspace

  • <F4> (MPX Plus 866 A and MLS 608 D Series only) - Opens the Video I/O workspace

  • <F5> - Opens the Console View workspace

  • <F6> - Toggles between Live mode and Emulate mode. If you are in Emulate mode, pressing <F6> is equivalent to clicking the Live mode button. If you are in Live mode, pressing <F6> is equivalent to clicking the Emulate mode button.

<Enter> Key

The <Enter> key performs the same action as a double-click. For example, the <Enter> key opens a dialog box when applicable or it will open the context menu from which a processor type may be selected. When the focus is on an action button, the <Enter> key executes the button action and toggles the button when applicable.

<Ctrl> Key

The <Ctrl> key can be used in the following shortcuts:

  • <Ctrl + X> - Cuts the selected elements

  • <Ctrl + C> - Copies the selected elements

  • <Ctrl + V> - Pastes the selected elements

  • <Ctrl + A> - This shortcut selects all switcher or switcher matrix nodes. For the DMP 64, this shortcut selects all elements within the application.

  • <Ctrl + A + A> (MPX Plus 866 A and MLS 608 D Series only) - Selects all elements within the program

<Alt> Key

The <Alt> key plus an assigned letter key is used to open and navigate menus. When the <Alt> key is pressed and either held or released, the first letters in the menu titles are underlined. Then, when the underlined letter key is pressed, the menu opens.

After a menu opens, additional underlined letters can be used to select a menu item. Alternatively, you can use the arrow keys to move within the menu.

To access submenu items after opening a menu:

  1. Press the <Down Arrow> key to move to the menu item.

  2. Press the <Right Arrow> key to open the submenu.

  3. Press the <Down Arrow> key to move to the submenu item.

The <Esc> key progressively backs out of menu selections and then defeats the <Alt> key mode.

Matrix Ties or Switcher Ties

Video and audio switcher ties can be made using only the keyboard. See the Switcher Matrix Operation section and the Switcher Operation section to understand which ties are being made from each I/O workspace.

To make matrix ties or switcher ties from input to output:

  1. Press the arrow keys or <Tab> key to navigate to the matrix input node from which you will make the tie.

  2. Press and hold the <Shift> key to enter a "make tie" mode.

  3. Press the <Right Arrow> key to move to the corresponding output node. A tie is made in a pending state and is indicated by a dashed line between the input and output.

  4. Release the <Shift> key.

  5. Press <Enter> to execute the tie. To make additional ties from the same input, go to step 6. To make additional ties from a different input, press the <Left Arrow> key once, then repeat steps 1 through 5. To exit the "make tie" mode, either press the <Esc> key or press the arrow keys to move away from the tied node.

  6. Press the <Up Arrow> or <Down Arrow> key in the direction of the tie you want to make. This makes a tie in a pending state.

NOTE:  If the cursor is on an input node number that is higher than the highest output node number, the focus moves to the highest numbered output.

Selecting Elements

When an element within the program has "focus," it is selected (though only one element retains focus when multiple elements are selected). You can select elements in order to perform the following functions:

  • Cut, copy, and paste

  • Save a preset

Cutting, copying, and pasting

Selected elements can be cut or copied, then pasted. When an element is cut, the element is not removed until it has been pasted. You can perform the cut, copy, and paste functions using either of the following keyboard methods:

Cut

  • Press <Ctrl + X>.

  • From the Edit menu, select Cut.

  • Press <Alt + E + T>.

Copy

  • Press <Ctrl + C>.

  • From the Edit menu, select Copy.

  • Press <Alt + E + C>.

Paste

  • Press <Ctrl + V>.

  • From the Edit menu, select Paste.

  • Press <Alt + E + P>.

Multiple elements can be selected, then cut or copied (or saved as a preset).

To select multiple elements:

  1. Press the arrow keys to move to the block from which to start selecting elements.

  2. Press and hold the <Shift> key, then use the arrow keys to navigate to and select multiple elements.

  3. Release the <Shift> key.

  4. Cut or copy the group of elements using one of the Cut or Copy methods listed above. Elements that are cut are not removed until they are pasted.

  5. Press the arrow keys to move to the upper left corner of the area to which you want to paste.

  6. Paste the elements using one of the Paste methods listed above. The block of elements that you paste to must exactly match the block of elements that were cut or copied.

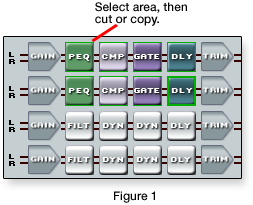
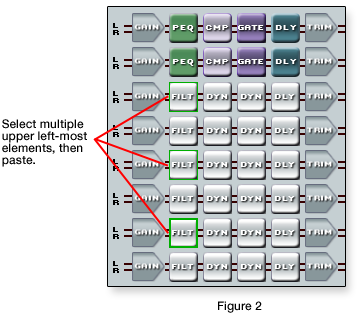
Example: Copying and pasting multiple elements

In figure 1 below, all of the processor blocks in the top two rows are selected and copied. In figure 2, the upper
left-most block is selected for each set of two rows to which the elements are to be pasted.  

To paste the first two rows three times, starting from the focus point shown in Figure 1:

  1. Press and hold the <Shift> key.

  2. Press the <Right Arrow> key three times. This selects four blocks in the top line.

  3. Press the <Down Arrow> key one time. This moves the focus to the second line.

  4. Press the <Left Arrow> key three times. This selects four blocks in the second line.

  5. Release the <Shift> key.

  6. Copy the selected elements (such as by selecting Edit > Copy).

  7. Press the <Down Arrow> key one time.

  8. Paste the elements (such as by selecting Edit > Paste). The first two rows are pasted in the second set of two rows.

  9. Press the <Down Arrow> two times.

  10. Paste the elements. The selected elements are pasted into the third set of two rows.

  11. Press the <Down Arrow> two times.

  12. Paste the elements. The selected elements are pasted into the fourth set of two rows.


Saving a preset

It is necessary to select elements in order to save them to a preset.

To select multiple elements and save them as a preset:

  1. Press the arrow keys to move to the block from which to start selecting elements.

  2. Press and hold the <Shift> key.

  3. Press the arrow keys to navigate to and select additional elements. When you reach the last element to be selected, press an <Arrow> key one more time to move away from the selected area.

  4. Release the <Shift> key.

  5. To retain the selection and skip to another element on the screen, press and hold the <Ctrl> key while repeating step 1.

  6. To highlight another element or group of elements, repeat steps 2 and 3.

  7. To save the selected elements as a preset, select Tools > Preset > Save Preset (or press
    <Alt + T>, <Right Arrow>, <Down Arrow>, <Down Arrow>).

  8. Press <Enter>.

See the "Presets" section in the DMP 64 book, MPX Plus 866 A book, or MLS 608 D Series book, depending on your device.