|
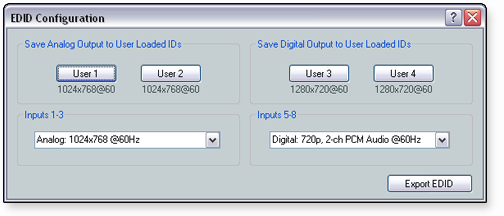
This option is used to access the EDID Configuration dialog. You can adjust the EDID settings for analog inputs 1 through 3 and digital inputs 5 through 8. You can also store EDID information provided at the analog or digital output to an associated location that you define. The EDID Manager enables continuous management of the EDID information to the input sources, ensuring that the source powers up properly and reliably outputs content to the display. EDID settings that are configured here, are applied directly to the inputs, and not saved with the DSP Configurator configuration file. See the Video Settings section for more information.
|
Saving EDID Information to a User-Defined LocationThese buttons reflect user-defined locations to which you can store the output EDID information. The text below the User 1, User 2, User 3, and User 4 buttons, details the default EDID setting (if no custom resolution and rate have been applied). The four user-defined locations have a default resolution and refresh rate. For analog output, the default is 1024x768 at 60 Hz. For digital output, the default is 720p at 60 Hz. To save the analog output EDID information to the User 1 or User 2 location:
To save the digital output EDID information to the User 3 or User 4 location:
|
Applying EDID to InputsSeveral resolutions and refresh rates are available for both analog and digital EDID. You can select from predefined resolutions or use the EDID settings that you stored in one of the user-defined locations (User 1, User 2, User 3, or User 4). The available resolutions vary between analog output and digital outputs. See the Saving EDID Information to a User-Defined Location subsection above, for details on saving EDID information. See the MLS 608 D Series User Guide for information about supported resolutions and refresh rates. To apply EDID for analog inputs 1 through 3:
To apply EDID for digital inputs 5 through 8:
For digital inputs, you have the option to apply Automatic mode. When you select Automatic mode, the EDID of the display device connected to the HDMI output will be read and stored automatically. The EDID information of the connected display is assigned to all of the digital inputs. |
Exporting an EDID ConfigurationYou can export an EDID configuration in order to open and view it in the Extron EDID Manager software, which is available at www.extron.com. EDID Manager aids in troubleshooting any EDID related issues that may occur during configuration or operation of an A/V system. See the EDID Manager help file for more information about using the EDID Manager software. To export an EDID Configuration:
|
![]()